Top ASP.NET Core MVC Interview Questions
Last Updated: May 15, 2025
1. What is ASP.NET MVC?
ASP.NET MVC is a web application framework developed by Microsoft that implements the Model-View-Controller (MVC) design pattern. It provides an alternative to the traditional ASP.NET Web Forms, offering a more structured approach to web application development by separating concerns, which enhances testability and maintainability.
Key Components:
- Model: Represents the application's data and business logic. It manages the data, logic, and rules of the application.
- View: Handles the display of the data (the user interface). It presents the model's data to the user.
- Controller: Manages user input and interactions. It works with the model to process data and returns the appropriate view to the user.
Advantages of Using ASP.NET MVC:
- Separation of Concerns: Divides the application into distinct components, making it easier to manage and scale.
- Testability: Facilitates unit testing and test-driven development (TDD) due to its decoupled architecture.
- Full Control over HTML: Provides developers with fine-grained control over the rendered HTML and JavaScript.
- Extensibility: Supports customizable components like routing, model binding, and view engines.
- Integration with Existing ASP.NET Features: Works seamlessly with features like authentication, authorization, and caching.
Comparison with ASP.NET Web Forms:
- ASP.NET MVC: Follows a stateless model, does not use ViewState, and promotes a clear separation of concerns.
- ASP.NET Web Forms: Uses ViewState and server controls, which can lead to less control over HTML and more complex page life cycles.
2. What are the three main components of an ASP.NET MVC application?
ASP.NET MVC is built around three fundamental components: Model, View, and Controller. Each plays a distinct role in application architecture, contributing to a clean separation of concerns.
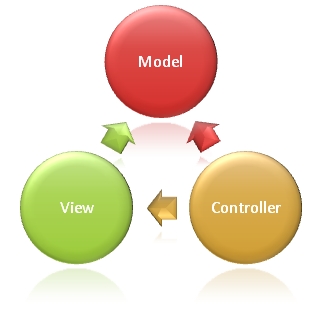
Model
The Model represents the application's data and business logic. It contains the classes that define data structures and manage interactions with the database. Model objects are responsible for retrieving, storing, and processing application data.
View
The View is responsible for rendering the User Interface (UI) to the client. Views are typically created using data from the Model and are defined using Razor syntax in .cshtml files. They provide a dynamic and responsive presentation layer.
Controller
The Controller handles incoming user requests. It acts as a coordinator between the Model and the View. Controllers process user input, perform business logic using Models, and return a View result to render the response. Essentially, they manage the application flow.
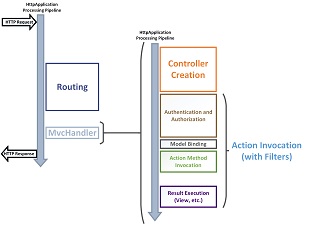
3. Explain ASP.NET MVC Lifecycle?
In ASP.NET MVC, the lifecycle refers to the sequence of steps involved in processing a web request from initiation to completion. It is categorized into two primary phases:
1. Application Life Cycle
The Application Life Cycle begins when the web application starts on the server and ends when it is shut down. This cycle is managed by the ASP.NET runtime within the IIS environment.
Key Events:
- Application_Start: Triggered when the application is first launched. Typically used to configure routes, filters, bundles, and dependency injection. Defined in
Global.asax. - Application_End: Invoked when the application is stopped or recycled. Used for cleanup operations, logging, and releasing resources.
2. Request Life Cycle (MVC Request Pipeline)
This lifecycle handles each individual HTTP request received by the application. It defines how the request is processed and how the response is generated.
Detailed Stages:
- Request Initiation: Browser sends a request to the server (IIS), which forwards it to the ASP.NET runtime.
- Routing: The routing module matches the URL to a specific controller and action method using
RouteData. - MvcHandler Execution: Retrieves route data and uses
ControllerFactoryto instantiate the controller. - Controller Initialization: The controller is initialized and filters (like
Authorize) are applied. - Action Method Execution: The action is called, and model binding maps request data to parameters.
- Result Preparation: The action returns an
ActionResultsuch asViewResultorJsonResult. - Result Execution: If a view is returned, the View Engine renders it. Other results are executed directly.
- Response Sent to Client: The generated HTML or data is returned to the browser, completing the request.
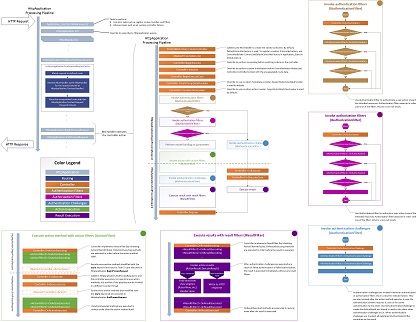
Visual Summary
A high-level view of the MVC application lifecycle, where you can understand the major stages that every MVC application passes through in the request processing pipeline.
High-Level Lifecycle View:
Detailed Lifecycle Flow:
4. What is Routing in ASP.NET MVC?
Routing in ASP.NET MVC is a powerful mechanism that maps incoming browser requests to controller actions. It defines how URLs are interpreted and how they determine which code should be executed.
How Routing Works:
When a user sends a request to an MVC application, the routing engine analyzes the URL and matches it to a pattern defined in the route configuration. This determines which controller and action method should handle the request.
Default Route Example:
routes.MapRoute(
  name: "Default",
  url: "{controller}/{action}/{id}",
  defaults: new { controller = "Home", action = "Index", id = UrlParameter.Optional }
);
- {controller}: The name of the controller class (e.g., HomeController).
- {action}: The method in the controller to invoke (e.g., Index).
- {id}: An optional parameter passed to the action method.
Benefits of Routing:
- Enables clean and SEO-friendly URLs.
- Decouples request paths from physical file locations.
- Allows customization and flexibility in URL patterns.
- Supports optional parameters and route constraints.
Attribute Routing (MVC 5+):
ASP.NET MVC also supports attribute routing, where routes are specified using attributes directly on controllers and actions for better clarity and control.
      [Route("products/{id}")]
      public ActionResult Details(int id)
      {
          // Action logic here
      }
This allows precise definition of URL structures and is especially useful in RESTful APIs.
5. What is Attribute Routing in ASP.NET MVC?
Attribute Routing allows you to define routes directly on controller actions using attributes. This approach was introduced in ASP.NET MVC 5 and offers better readability and control, especially useful for RESTful services and complex routing scenarios.
With attribute routing, routes are defined by decorating controller actions with the [Route] attribute instead of defining them centrally in RouteConfig.cs.
How to Enable Attribute Routing
In RouteConfig.cs, add the following line:
public class RouteConfig
{
    public static void RegisterRoutes(RouteCollection routes)
    {
        routes.IgnoreRoute("{resource}.axd/{*pathInfo}");

        // Enable attribute routing
        routes.MapMvcAttributeRoutes();

        routes.MapRoute(
            name: "Default",
            url: "{controller}/{action}/{id}",
            defaults: new { controller = "Home", action = "Index", id = UrlParameter.Optional }
        );
    }
}
Example Usage
public class ProductsController : Controller
{
    [Route("products/details/{id}")]
    public ActionResult Details(int id)
    {
        // Logic here
        return View();
    }
}
This route maps URLs like /products/details/5 to the Details action with id = 5.
Advanced Example: Route Prefix and Constraints
[RoutePrefix("store")]
public class StoreController : Controller
{
    [Route("product/{id:int}")]
    public ActionResult Product(int id)
    {
        return View();
    }
}
This maps URLs like /store/product/10 to the Product action only if id is an integer.
6. When to Use Attribute Routing in ASP.NET MVC?
Attribute Routing is ideal when you want more control over your route definitions directly in your controllers. It is especially useful for RESTful API design, custom URL structures, and scenarios where routes are tightly coupled to action methods.
Use Attribute Routing When:
- You are building a RESTful API and want to map HTTP verbs and resource routes directly to actions.
- You need clear, readable URLs that don’t follow the default
{controller}/{action}/{id}pattern. - You want to use route constraints (e.g., only accept integers for IDs) or custom patterns.
- Your application requires localized routes (e.g., different URL paths per language).
- You need route prefixes and hierarchies within a controller (e.g., grouping routes under a specific segment).
Example Scenario:
[RoutePrefix("api/products")]
public class ProductsController : Controller
{
    [Route("")]
    public ActionResult GetAll()
    {
        // Get all products
    }

    [Route("{id:int}")]
    public ActionResult GetById(int id)
    {
        // Get product by ID
    }
}
In this example, URLs like /api/products and /api/products/5 map directly to specific methods, making your routing explicit and maintainable.
When Not to Use Attribute Routing:
- If you prefer centralized routing logic in
RouteConfig.cs. - For very large applications where route definitions are standardized and separated from controller logic.
7. Explain about ASP.NET MVC Filters
In ASP.NET MVC, Filters are attributes used to inject pre-processing and post-processing logic into the request life cycle. They help in separating cross-cutting concerns such as logging, authorization, error handling, and caching.
Types of Filters in MVC:
- Authorization Filters
Used to implement security and access control. Executes before any other filter.[Authorize],[AllowAnonymous] - Action Filters
Runs before and after an action method executes. Useful for logging, validation, etc.OnActionExecuting,OnActionExecuted - Result Filters
Runs before and after the action result (e.g., view rendering) is executed.OnResultExecuting,OnResultExecuted - Exception Filters
Handles exceptions thrown during the execution of the controller or action method.[HandleError],OnException
Custom Filter Example:
public class LogActionFilter : ActionFilterAttribute
{
    public override void OnActionExecuting(ActionExecutingContext filterContext)
    {
        // Custom logic before action method
    }

    public override void OnActionExecuted(ActionExecutedContext filterContext)
    {
        // Custom logic after action method
    }
}
You can apply filters globally, at the controller level, or on individual action methods:
[LogActionFilter]
public class HomeController : Controller
{
    public ActionResult Index()
    {
        return View();
    }
}
Key Points:
- Filters enhance separation of concerns.
- They follow a specific execution order: Authorization → Action → Result → Exception.
- Can be reused across controllers and actions.
8. What are Action Filters in ASP.NET MVC?
Action Filters in ASP.NET MVC are a type of filter that allows you to run custom logic before and after the execution of an action method. These filters help in implementing cross-cutting concerns like logging, auditing, or input validation.
Built-in Action Filters:
- OnActionExecuting: Runs before the action method starts executing.
- OnActionExecuted: Runs after the action method has executed.
Custom Action Filter Example:
public class LogActionFilter : ActionFilterAttribute
{
    public override void OnActionExecuting(ActionExecutingContext filterContext)
    {
        // Pre-action logic here
    }

    public override void OnActionExecuted(ActionExecutedContext filterContext)
    {
        // Post-action logic here
    }
}
Usage:
[LogActionFilter]
public ActionResult Index()
{
    return View();
}
Action filters are ideal when you want to apply logic around action execution without cluttering your controller code.
9. What is Partial View in ASP.NET MVC?
A Partial View in ASP.NET MVC is a reusable view component that renders a portion of HTML content. It is used to break down large views into smaller, manageable, and reusable parts, which promotes clean and modular design.
When to Use Partial Views:
- To share common HTML across multiple views (e.g., headers, footers, menus).
- To dynamically update parts of a page using AJAX.
- To keep the main view simpler and cleaner.
How to Create and Render a Partial View:
Step 1: Create a Partial View (e.g., _UserProfile.cshtml)
@model MyApp.Models.User

<div class="user-profile">
    <p>Name: @Model.Name</p>
    <p>Email: @Model.Email</p>
</div>
Step 2: Render it inside another view:
@Html.Partial("_UserProfile", Model.User)
Partial vs View:
- Partial View does not contain layout or sections.
- View is a full-page HTML with layout and content sections.
Using partial views promotes code reuse and simplifies complex UIs by isolating responsibilities.
10. Difference between View and Partial View in ASP.NET MVC
| Aspect | View | Partial View |
|---|---|---|
| Purpose | Renders a complete web page with layout, sections, and full HTML content. | Renders a fragment or portion of HTML to be included inside other views. |
| Layout | Uses the shared layout (_Layout.cshtml) or specific layout files. | Does not use a layout by default; it’s just a snippet of HTML. |
| Use Case | Used for full page rendering of content. | Used for reusable components like headers, footers, or AJAX-updatable parts. |
| Rendering | Returned from controller action using return View(). | Rendered inside a view using @Html.Partial() or @Html.RenderPartial(). |
| Example | User dashboard page showing full content with menus and layout. | User profile snippet rendered inside the dashboard page. |
11. Difference between ViewBag and ViewData in ASP.NET MVC
| Aspect | ViewData | ViewBag |
|---|---|---|
| Type | Dictionary of objects (ViewDataDictionary) accessed by string keys. | Dynamic property wrapper around ViewData using C# dynamic features. |
| Syntax | ViewData["Name"] = "John"; | ViewBag.Name = "John"; |
| Null Safety | Compile-time checking is less strict; needs casting when retrieving data. | More convenient syntax with dynamic typing but no compile-time type checking. |
| Lifetime | Valid only during the current HTTP request. | Valid only during the current HTTP request. |
| Usage | Useful when you want to pass data using string keys explicitly. | More developer-friendly syntax, especially in Razor views. |
| Performance | Slightly faster as it is a dictionary. | Slightly slower due to dynamic feature overhead. |
Both ViewBag and ViewData are used to pass data from Controller to View for a single request, but ViewBag offers a more readable and cleaner syntax.
12. What is TempData and how is TempData related to Session in ASP.NET MVC?
TempData is a key-value dictionary used in ASP.NET MVC to store data temporarily between two consecutive requests. It is particularly useful when redirecting from one controller action to another and you need to persist some data during that redirection.
It is derived from the TempDataDictionary class and is part of the ControllerBase class. TempData uses the underlying Session state to store the data, which means it persists data on the server for a short period.
🔹 Use Cases of TempData:
- To pass temporary messages or data (e.g., success or error notifications) between actions.
- Used in the Post/Redirect/Get (PRG) pattern to avoid form resubmission issues.
- For situations where ViewBag or ViewData won't work due to their single-request limitation.
🔹 How TempData Works:
TempData keeps the information for the duration of an HTTP Request. Once the value is read, it is marked for deletion at the end of that request. If you need to keep it longer, you can use TempData.Keep() or TempData.Peek().
🔹 Differences between TempData and Session:
| Feature | TempData | Session |
|---|---|---|
| Lifetime | One subsequent request (unless kept) | Until explicitly removed or expired |
| Use Case | Temporary message passing between actions | Storing user data like cart, user login info |
| Read Behavior | Removed after reading once | Persists until cleared |
| Storage Mechanism | Internally uses Session | Stored on the server (InProc, StateServer, SQLServer) |
🔹 Code Example:
// Controller A
public ActionResult Submit()
{
    TempData["SuccessMessage"] = "Data saved successfully!";
    return RedirectToAction("Confirm");
}

// Controller B
public ActionResult Confirm()
{
    // Will be available only once unless Peek or Keep is used
    ViewBag.Message = TempData["SuccessMessage"];
    return View();
}
🔹 Important Methods:
TempData["key"]– Reads and removes the data.TempData.Peek("key")– Reads data without removing it.TempData.Keep("key")– Keeps the data for the next request.
📝 Notes:
- Since TempData is Session-based, Session must be enabled in the application for TempData to work properly.
- TempData is ideal for scenarios involving redirection, where data needs to persist across actions.
- It's not recommended to store large objects in TempData due to session memory limits.
13. What is Authentication and Authorization in ASP.NET MVC?
In ASP.NET MVC, Authentication and Authorization are fundamental security concepts used to control access to parts of a web application. They help verify who a user is and determine what they can do.
🔐 Authentication:
Authentication is the process of verifying the identity of a user. It answers the question: "Who are you?"
Once authenticated, a user’s identity is established using credentials such as a username and password. The most common authentication methods in ASP.NET MVC include:
- Forms Authentication: Custom login forms with authentication cookies.
- Windows Authentication: Uses Windows credentials; best for intranet apps.
- OAuth/OpenID Connect: External identity providers like Google, Microsoft, Facebook.
🔧 Example: Configuring Forms Authentication in web.config:
<authentication mode="Forms">
  <forms loginUrl="~/Account/Login" timeout="30" />
</authentication>
🔒 Authorization:
Authorization determines whether an authenticated user has permission to access a specific resource or action. It answers the question: "What are you allowed to do?"
ASP.NET MVC uses the [Authorize] attribute to restrict access:
[Authorize]
public ActionResult Dashboard()
{
    return View();
}
You can also restrict by roles:
[Authorize(Roles = "Admin")]
public ActionResult AdminPanel()
{
    return View();
}
To allow anonymous access explicitly:
[AllowAnonymous]
public ActionResult Login()
{
    return View();
}
🔁 How it Works Together:
- The user requests a resource (e.g., a controller action).
- ASP.NET checks if the user is authenticated.
- If authenticated, it checks for authorization rules.
- If both pass, the resource is served; otherwise, the user is redirected or shown an error.
📝 Summary:
| Aspect | Authentication | Authorization |
|---|---|---|
| Purpose | Identify the user | Grant or deny access |
| Order | Comes first | Comes after successful authentication |
| Implementation | Forms, Windows, OAuth | [Authorize] attribute, Role-based checks |
🚨 Best Practices:
- Use HTTPS to secure credentials during authentication.
- Keep authentication tokens secure (e.g., use cookies with HttpOnly and Secure flags).
- Use role-based or policy-based authorization for fine-grained control.
- Leverage external identity providers using OAuth/OpenID for modern apps.
14. What is Dependency Injection and How is it Implemented in MVC?
Dependency Injection (DI) is a software design pattern that allows classes to receive their dependencies from external sources rather than creating them directly.
🔹 Benefits of DI:
- Promotes loose coupling.
- Improves testability (enables mocking in unit tests).
- Makes code easier to maintain and extend.
🔹 DI in ASP.NET MVC:
You can use popular DI containers such as Ninject, Autofac, or Unity to implement DI in MVC.
Example using constructor injection:
// Interface
public interface IProductService
{
    List<Product> GetAll();
}

// Implementation
public class ProductService : IProductService
{
    public List<Product> GetAll() { /* logic */ }
}

// Controller
public class ProductController : Controller
{
    private readonly IProductService _service;

    public ProductController(IProductService service)
    {
        _service = service;
    }

    public ActionResult Index()
    {
        var products = _service.GetAll();
        return View(products);
    }
}
🔹 ASP.NET Core Built-in DI:
In ASP.NET Core, DI is built-in. Register services in Program.cs or Startup.cs:
builder.Services.AddScoped<IProductService, ProductService>();📝 Summary:
- DI helps to follow the Dependency Inversion Principle.
- Controllers become easier to test and manage.
- ASP.NET Core simplifies DI with built-in support.
15. What is _ViewStart in ASP.NET MVC?
The _ViewStart.cshtml file is a special Razor view file that runs before every view is rendered in an ASP.NET MVC application. It is primarily used to define common settings or code that should apply to multiple views, such as specifying a layout page.
Instead of repeating the layout declaration in every view, you can put the following in _ViewStart.cshtml:
@{
    Layout = "~/Views/Shared/_Layout.cshtml";
}
This means every view will use the specified layout by default, improving code reuse and maintainability.
Key points about _ViewStart:
- It runs before rendering every view in the folder it resides in and its subfolders.
- You can have multiple
_ViewStart.cshtmlfiles scoped to different folders. - It helps avoid code duplication for common view settings like layout and ViewBag initializations.
16. What is Scaffolding in ASP.NET MVC?
Scaffolding is a code generation framework in ASP.NET MVC that automatically generates the boilerplate code for CRUD (Create, Read, Update, Delete) operations based on your data model. It helps speed up development by creating controllers, views, and sometimes data context classes with minimal manual coding.
When you scaffold a controller or view for a model, the tool generates:
- Controller actions for standard CRUD operations.
- Views for displaying, creating, editing, and deleting data.
- Model binding and validation based on the model properties.
Scaffolding can be done using Visual Studio UI or the command line (CLI) tools, and it is especially useful for rapid prototyping and initial development.
Benefits of Scaffolding:
- Reduces repetitive coding for standard operations.
- Ensures consistent code structure following best practices.
- Helps beginners understand how MVC components interact.
17. What are Action Methods in ASP.NET MVC?
In ASP.NET MVC, Action Methods are public methods in a Controller class that respond to HTTP requests. When a user makes a request to a URL, the MVC framework uses the routing system to determine which controller and which action method to invoke.
🔹 Characteristics of Action Methods:
- They are defined in controller classes which inherit from
Controller. - They must be public and non-static.
- They return an
ActionResultor one of its derived types such asViewResult,JsonResult,RedirectResult, etc. - They can accept parameters mapped from URL segments, query strings, or form data.
🔧 Basic Example:
public class HomeController : Controller
{
    public ActionResult Index()
    {
        return View();
    }

    public ActionResult Details(int id)
    {
        var model = db.Products.Find(id);
        return View(model);
    }
}
🔸 Return Types:
Action methods can return different types of results:
ViewResult– returns a view pageRedirectResult– redirects to another URLJsonResult– returns JSON dataFileResult– returns a file to downloadContentResult– returns plain text contentEmptyResult– returns no result
🔒 Action Method Restrictions:
- A method must not be marked
privateorstatic. - Methods decorated with the
[NonAction]attribute are not treated as actions.
[NonAction]
public void HelperMethod()
{
    // This will not be treated as an action method
}
🔄 Action Method Overloading:
You can overload action methods, but MVC cannot resolve overloaded methods based on parameters alone. You may need to use attributes like [HttpGet] and [HttpPost] to differentiate them.
[HttpGet]
public ActionResult Create()
{
    return View();
}

[HttpPost]
public ActionResult Create(Product model)
{
    // Save logic
    return RedirectToAction("Index");
}
📝 Summary:
- Action Methods are the core of a controller in MVC.
- They respond to incoming requests and return appropriate results.
- They support model binding, filters, and overloading with HTTP attributes.
18. What are different return types in ASP.NET MVC?
In ASP.NET MVC, action methods can return various types of results derived from the ActionResult class. Choosing the correct return type controls what the browser receives and how your application behaves.
Common Return Types:
- ViewResult: Returns a fully rendered HTML view. Example:
return View("Index"); - PartialViewResult: Returns a partial view (HTML fragment), useful for AJAX updates. Example:
return PartialView("_ProductList"); - JsonResult: Returns JSON data, typically for client-side scripts. Example:
return Json(new { success = true }); - RedirectResult: Redirects to another URL. Example:
return Redirect("/Home/About"); - RedirectToRouteResult: Redirects to an action method using route parameters. Example:
return RedirectToAction("Index", "Home"); - ContentResult: Returns plain text or raw content. Example:
return Content("Hello World!"); - FileResult: Sends a file to the client. Example:
return File(filePath, "application/pdf"); - HttpStatusCodeResult: Returns an HTTP status code (e.g., 404). Example:
return new HttpStatusCodeResult(404); - EmptyResult: Returns nothing. Example:
return new EmptyResult();
Why it matters: The return type controls user experience and client-server communication. For example, JsonResult is essential for AJAX or SPA applications, while ViewResult suits traditional page loads.
19. Difference between RenderBody and RenderPage in ASP.NET MVC?
Both RenderBody() and RenderPage() are Razor methods used to insert HTML content in views or layouts, but they serve different purposes.
RenderBody()
- Used only inside layout pages.
- Acts as a placeholder for the main content of child views.
- Only one
RenderBody()is allowed per layout. - Defines where the view content will be injected in the layout.
<!DOCTYPE html>
<html>
<head>
    <title>My App</title>
</head>
<body>
    <header>
        <!-- Header HTML -->
    </header>

    @RenderBody()  <!-- Child views' content inserted here -->

    <footer>
        <!-- Footer HTML -->
    </footer>
</body>
</html>
RenderPage()
- Can be used inside views or layouts.
- Includes any Razor page or partial snippet.
- Can be called multiple times in a single page.
- Useful for reusable components like headers, footers, or menus.
@RenderPage("Header.cshtml")
<p>Main content here</p>
@RenderPage("Footer.cshtml")
Summary:
| Feature | RenderBody() | RenderPage() |
|---|---|---|
| Purpose | Placeholder for child views' main content | Includes any Razor page or snippet |
| Usage Location | Layout pages only | Views or layouts |
| Number Allowed | One per layout | Multiple per page |
| Content Inserted | Child view content | Partial reusable content |
20. What are the Layouts in ASP.NET MVC?
Layouts in ASP.NET MVC are Razor files that define a common template or structure shared across multiple views, similar to master pages in Web Forms. They help maintain consistent UI and avoid repeating markup like headers, footers, and navigation menus.
How Layouts Work:
- Typically stored in
~/Views/Shared/_Layout.cshtml. - Use the
@RenderBody()method to define where child views’ content will be placed. - Views specify their layout by setting the
Layoutproperty, often in_ViewStart.cshtml.
<!DOCTYPE html>
<html>
<head>
    <title>@ViewBag.Title - My MVC App</title>
    <link href="~/Content/site.css" rel="stylesheet" />
</head>
<body>
    <nav>
        <!-- Navigation menu -->
    </nav>

    <section>
        @RenderBody()  <!-- Child view content goes here -->
    </section>

    <footer>
        <p>© 2025 My Company</p>
    </footer>
</body>
</html>
@{
    Layout = "~/Views/Shared/_Layout.cshtml";
}
Benefits of Layouts:
- Consistent look and feel across pages.
- Code reuse and easier maintenance.
- Supports nested layouts for complex page designs.
- Optional sections can be added using
@RenderSection()for scripts or styles. - Multiple layouts can be used for different areas (e.g., Admin vs Public).